Wires: a practical guide for vascular trainees
Understand guidewires from first principles: how the wire, catheter and sheath work together; how diameter, length, tip, shaft and coating affect selection; and how to preserve access during navigation and exchange.
Written August 20, 2026 · Mr Razhan K Ali
1. Start here: what is a guidewire?
A guidewire is a long, thin, flexible medical wire. The operator controls it from outside the patient while its leading tip travels inside the vessel. Compatible equipment slides over its shaft to reach the target. It establishes a route and provides a rail for treatment equipment; it is normally removed when its job is complete.[1,2,3]
Three pieces of equipment work together:
- Wire — finds and preserves the route. Its tip leads; its shaft supports equipment following behind.
- Catheter — a flexible hollow tube. It passes over the wire, helps direct and support it, and may deliver contrast for imaging.
- Sheath — the access tube. It sits through the vessel entry site, allowing devices to pass in and out. Its external hub contains a valve to limit blood loss.[1,2]
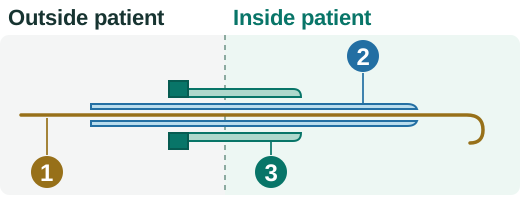
Original conceptual illustration; component relationships from sources 1 and 2.
What happens in a simple balloon procedure?
Consider a narrowed leg artery. First, vessel access is established: a needle enters the vessel, a wire passes through it, and the needle is removed. Once wire position is satisfactory, a sheath with a tapered dilator passes over the wire; removing the dilator leaves the sheath as the entry channel.[2]
Through this access, the operator uses a wire and catheter together to reach and cross the narrowing, then confirms the intended route and position beyond it. A balloon catheter follows the wire to the narrowing and is inflated to widen it. A stent, if needed, is a scaffold left in the artery to help hold it open. The wire preserves access while devices change and the result is checked; it is removed when no longer needed.[1,2]
Access → navigate → cross → confirm position → deliver treatment → check the result. This is an orientation to the procedure; the later sections explain the checks and hazards.
The flexible wire can find a path that a larger device cannot negotiate alone. But one wire may not do every job: finding a route and supporting a device are different demands. Retain it if it supports the next device adequately; otherwise exchange through a catheter that preserves the route.[1,2]
A few words that make the rest understandable
The lumen is the vessel's normal blood-carrying channel. A stenosis narrows it; an occlusion blocks it. A lesion is the diseased segment. Crossing means getting beyond that segment. A wire can also enter a plane within the vessel wall: this may create a dissection. Deliberate subintimal crossing uses a wall plane to bypass an occlusion and requires re-entry into the true lumen beyond it.[1,4]
Fluoroscopy provides moving X-ray images used to follow equipment. Contrast is introduced through a catheter to help outline the vessel channel on X-ray. A wire appearing over the expected vessel course on a two-dimensional image does not prove that it lies in the intended lumen.[1,2]
2. Know what you are choosing
Diameter: will the whole system fit?
The wire platform is its outside diameter. A 0.035-inch wire is wider than a 0.014-inch wire; the number does not tell you how stiff either one is. When someone asks for an “035”, they usually mean a 0.035-inch wire.[1,2]
| Platform | Common use | What to check |
|---|---|---|
| 0.014 inch | Below-knee and other small-vessel work; devices with a small diameter where they pass through the narrowing (a small crossing profile) | The particular wire must still provide enough support. |
| 0.018 inch | Smaller peripheral vessels and compatible treatment devices | It is not automatically more supportive than every 0.014 wire. |
| 0.035 inch | Access, diagnostic catheter work, larger peripheral intervention and aortic delivery | Some larger systems accept 0.038 inch; use the specified diameter. |
Check the labelled compatibility of every component. A smaller wire may fit a larger lumen yet track poorly. Catheter French size usually describes outer diameter; sheath French size usually describes the catheter size it accommodates. Neither tells you the compatible wire diameter.[1,2]
Length: can you finish the exchange while holding the wire?
An over-the-wire (OTW) device runs over the wire along its full length. Distal purchase is the wire length safely retained beyond the target segment: too little is easily lost; too much can enter small branches or perforate. Allow for:
Distal purchase + puncture-to-target distance + sheath hub-to-puncture distance + full device length + an external segment you can hold.
A rapid-exchange (monorail) device uses only a short distal wire lumen, reducing the external length needed. A shorter wire is sufficient only if all planned exchanges allow it: one OTW device can change the requirement. Rapid-exchange tracking also benefits from sheath or guiding-catheter support close to the lesion.[1]
Exchange length and shaft stiffness are separate choices. Some texts use “exchange wire” to mean a stiff support wire; that does not make every long wire stiff.[1,2]
Tip and shaft: steering is different from support
Common designs have a metal core surrounded by a fine coil or polymer covering. Tapering the core towards the tip can make the leading end flexible while the shaft remains supportive. Diameter alone cannot describe this construction.[1,2]
Support means resisting bending or buckling as a device advances over the wire. If the system bends or shifts instead, the device may not move forwards. Bringing a compatible catheter or sheath closer can improve support without changing the wire.[1,2]
- Soft straight or J tip: the J tip curves back like the letter J. Soft tips reduce injury risk during access and passage through open vessels, but can still injure a vessel.
- Angled or shapeable tip: direction for branch selection and off-centre narrowings.
- Higher tip load: greater resistance to bending at the tip; potentially useful for resistant lesions, with less margin for error.
- Stiffer shaft: more support for device passage, but less forgiving navigation. A stiff shaft can still have a soft tip.[1,2]
Pushability is transmission of forward force; torque response is how rotation at your hand changes tip direction; trackability is how readily the wire follows the route. Rotation may accumulate before the tip responds. Do not assume one turn at the hand means one turn at the tip.[1,2,3]
“Stiff”, “super-stiff” and “extra-stiff” are not a universal scale: compare the particular wire and system, not just the name.[5]
Surface and shaping: read the exact instructions
A hydrated hydrophilic coating reduces friction. That helps navigation, but reduces tactile feedback and allows unnoticed migration or easy passage into a dissection plane. Polymer jacket means an outer polymer covering; hydrophilic coating describes a surface treatment. They can coexist. Neither term tells you the shaft stiffness.[1,6]
Shape only as the exact instructions for use (IFU) permit. Some wires may be shaped; others must not be. Follow the preparation fluid and handling instructions for the device in your hand.[6,7]
Sharp metal interfaces, tight catheters or valves, unsuitable solvents and excessive wiping can damage coatings. Detached material can travel downstream and block vessels or provoke inflammation. A torque device is a handle that grips the wire to aid rotation: use a compatible one and loosen it before repositioning.[6,7,8]
3. Match the wire to the job
| Job | Useful starting characteristics | Main trap |
|---|---|---|
| Access | Soft-tipped wire matched to needle and dilator | Dilating before wire position is satisfactory; kinking at the skin entry. |
| Navigation or branch selection | Atraumatic or angled wire with a directional catheter | Continuing to rotate when the tip does not respond. |
| Lesion crossing | Steerable wire and compatible support catheter, chosen for the intended route | Mistaking easy hydrophilic passage for true-lumen passage. |
| Device delivery | Enough shaft support, length and distal purchase for the device | Advancing a stiff wire as the exploratory leading wire. |
This is a selection framework, not a fixed wire sequence. Long-standing complete blockages (chronic total occlusions) need an explicit true-lumen or subintimal strategy, appropriate imaging and supervised escalation.[1,2,4]
For aortic delivery, establish the route with a soft wire and catheter before exchanging to the required support wire. Loftus describes an ascending-aortic tip position for endovascular abdominal and thoracic aortic repair (EVAR and TEVAR); this is a procedure-specific example, not a universal landing point. Choose the position and wire configuration for the anatomy, operation and device IFU. Keep the tip under fluoroscopic control: cardiac perforation, arrhythmia and valvular injury are recognised hazards.[9,10,11]
4. Use and exchange it safely
Before insertion
Agree the current task, next device, intended distal position and rescue plan. Check diameter, length, tip orientation, device integrity, expiry, permitted vascular territory and material contraindications. Prepare the wire and flush the catheter as labelled.[6,7,8,11]
At access, stop if the wire will not pass easily and reassess needle position. Do not dilate until wire position is satisfactory. Maintain controlled wire tension and follow the puncture angle as the dilator or sheath advances; slack wire and an acute angle can cause a kink. Exchange a kinked wire.[1,2]
During navigation
If the shaft bows instead of transmitting movement, closer catheter support may help after you have confirmed the position. Keep the unsupported segment short enough to direct the wire. Use a projection that separates overlapping vessels. Make small, deliberate movements near disease and observe the tip whenever the wire moves.[1,6,7,11]
Stop adding force if your hand moves but the tip does not, the tip suddenly jumps, or the wire follows an unexpected course. Maintain external control and identify the cause under fluoroscopy before advancing, withdrawing or rotating again. Check the whole wire–catheter path, not just the tip.[1,6,7,11]
After crossing: prove where you are
Before a balloon, stent, sheath or graft follows:
- Gently advance a compatible catheter to the intended distal vessel while maintaining wire control. If it will not follow safely, stop.
- Check for blood return before injecting contrast. If absent, reassess catheter position before injection. Blood return alone does not prove the intended distal true lumen.
- Confirm the catheter's location with a cautious contrast injection from a stable position using a compatible injection setup. Do not force injection against resistance. Obtain further projections if overlap could hide a collateral or abnormal course.
- If uncertainty remains, stop treatment-device advancement and obtain experienced help and appropriate additional imaging, such as intravascular ultrasound (IVUS). After an intentional subintimal crossing, confirm distal true-lumen re-entry before reconstruction.[1,4]
A wire–catheter combination can occlude a critical stenosis. Check distal flow and anticoagulation with the supervising team; do not leave flow arrested while repeatedly re-planning.[1]
Two exchanges: know what stays still
An exchange replaces one component while another preserves the route already gained. Removing both can lose access across a difficult lesion. New wire → catheter stays. New catheter or device → wire stays.[1]
| What changes? | What stays in position? | Sequence |
|---|---|---|
| Wire | Catheter | Advance the catheter to a stable, confirmed distal position. Hold it there, remove the old wire and introduce the new wire flexible end first under fluoroscopy. Confirm the new tip and course before removing the catheter. |
| Catheter or device | Wire | Withdraw the device over the wire while maintaining distal purchase and enough external wire to hold. One operator pins the wire: holds its position steady while the device moves over it. |
Keep the tip under fluoroscopic control during exchange, following the exact IFU; observe any wire movement and check for migration. Preserve wire access across the treated segment until treatment is complete and the result is satisfactory. It may be difficult to cross again.[1,6,7,9,11]
5. When something goes wrong
Resistance or a device that will not follow
Stop and identify the cause: wrong course, small branch, stent strut, poor support, incompatible device, tight valve, kink or damaged coating. Do not repeatedly test a resistant combination. Once the route is confirmed, options may include bringing support closer, changing catheter or device profile, exchanging to an appropriate rail, opening the lesion first with a smaller balloon (predilation), where feasible, or a different access direction.[1,4,6,7,8]
Wire migration or entrapment
If the tip migrates during exchange, stop both components, restore imaging and reassess whether position can safely be recovered through the catheter. If entrapped, stop pulling and rotating; obtain experienced endovascular help. A wire can cross through an unapposed stent strut and entangle the next device. An appropriate J tip may reduce strut passage, but does not guarantee a safe course.[1,6]
Suspected dissection or perforation
An abnormal course, contrast staining or leakage outside the vessel (extravasation), pain, reduced downstream flow or a change in blood pressure or pulse should prompt immediate reassessment. Stop advancement, call for senior help and assess haemodynamics and distal flow while preserving useful access if safe.[1,4]
A flow-limiting dissection may need balloon treatment or stenting. Active rupture may need a balloon inflated to control bleeding (tamponade) and an appropriate covered stent. Iliac or more proximal bleeding can be rapidly life-threatening; smaller distal perforations may be contained, but still need assessment. Resuscitation, anticoagulation decisions and any embolisation or open repair depend on the injury and supervising team's plan. Do not reflexively remove potentially useful access.[4]
Kink, fracture or coating damage
Do not straighten and reuse a kinked wire or continue cycling it through a tight interface. If fracture or coating loss is suspected, stop, assess the full system and account for components; obtain a safe removal or retrieval plan.[6,7,8]
Retain the device and packaging for investigation, and follow the local device-incident reporting pathway.[12]
6. Put it into practice
You have crossed a long superficial femoral artery (SFA) occlusion, but the balloon will not follow.
First confirm the intended route and distal true-lumen position. Then locate the problem: balloon crossing profile, calcification, access angle, inadequate distal purchase, or loss of support between sheath, catheter and wire. Bring support closer if safe. If a better rail is needed, exchange through the retained catheter without losing distal position. A different device profile or access direction may solve the problem better than greater wire stiffness. Predilation is an option only if an appropriate balloon can reach the lesion safely.[1,4]
The key judgement is recognising that crossing has finished and delivery is now the task.
References
- Schneider PA. Endovascular Skills: Guidewire and Catheter Skills for Endovascular Surgery. 4th ed. Boca Raton: CRC Press; 2020. doi:10.1201/9780429156304.
- Jamieson P, Allouni AK. Basic tools and terminology for endovascular interventions. In: Geroulakos G, Avgerinos E, Becquemin JP, Makris GC, Froio A, editors. Mastering Endovascular Techniques: Tips and Tricks in Endovascular Surgery. Cham: Springer; 2024. p.33–47. doi:10.1007/978-3-031-42735-0_5.
- US Food and Drug Administration. Coronary, peripheral, and neurovascular guidewires: performance tests and recommended labeling. 2019 Oct 10 [cited 2026 Sep 30]. Guidance.
- Makris G, Parker M, Ali T. Re-entry and recanalisation techniques in the endovascular management of peripheral arterial disease. In: Geroulakos G, Avgerinos E, Becquemin JP, Makris GC, Froio A, editors. Mastering Endovascular Techniques: Tips and Tricks in Endovascular Surgery. Cham: Springer; 2024. Chapter 11. doi:10.1007/978-3-031-42735-0_11.
- Chaudhuri A, Heim F, Chakfe N. Are all wires created the same? A quality assurance study of the stiffness of wires typically employed during endovascular surgery using tension dynamometry. EJVES Vasc Forum. 2021;52:20–24. doi:10.1016/j.ejvsvf.2021.06.006.
- Boston Scientific. V-18 Control Wire guidewire with ICE hydrophilic coating: instructions for use. 51358558-01A. 2023 Feb [cited 2026 Sep 30]. IFU.
- Terumo Corporation. GLIDEWIRE instructions for use. US label. RG34B501-01. 2020 Jul [cited 2026 Sep 30]. IFU.
- US Food and Drug Administration. Intravascular catheters, wires, and delivery systems with lubricious coatings: labeling considerations. 2019 Oct 10 [cited 2026 Sep 30]. Guidance.
- Tambyraja AL. Peripheral and abdominal aortic aneurysms. In: Loftus I, Hinchliffe RJ, editors. Vascular and Endovascular Surgery: A Companion to Specialist Surgical Practice. 7th ed. Elsevier; 2024. Chapter 13. Publisher.
- Rolls A, Loftus I, Holt P. Thoracic and thoraco-abdominal aortic disease. In: Loftus I, Hinchliffe RJ, editors. Vascular and Endovascular Surgery: A Companion to Specialist Surgical Practice. 7th ed. Elsevier; 2024. Chapter 14. Publisher.
- Cook Medical. Lunderquist Extra Stiff Wire Guides: instructions for use. I-LES-DC-315-08 [cited 2026 Sep 30]. IFU.
- Medicines and Healthcare products Regulatory Agency. The Yellow Card scheme: guidance for healthcare professionals, patients and the public. Updated 2025 Jul 24 [cited 2026 Sep 30]. Guidance.