Endovascular Catheters: Types and Selection
Understand endovascular catheter types, shapes and selection, wire compatibility, safe contrast injection, exchanges and troubleshooting. A practical guide for vascular surgery trainees.
Mr Razhan K Ali · Reviewed October 1, 2026
AT A GLANCE
An endovascular catheter is a flexible hollow tube used to direct a wire, support it, preserve access during an exchange and deliver contrast or compatible treatment. Its shape, lumen and shaft work with the wire, sheath and anatomy.[1,2]
Choose for the next task, then check the whole system can perform it. Selecting an artery, supporting treatment and injecting contrast place different demands on the equipment. Before moving or injecting, establish the tip position, the component that should remain still and the expected response.[1]
Related guides: Endovascular guidewires · Percutaneous access, sheaths and closure devices.
DESIGN & FUNCTION
The parts and their jobs
The hub is the external connection for a wire, syringe or compatible device. The shaft is the long body transmitting movement from the operator. The head is the shaped distal segment; the tip is its leading end. Proximal means towards the hub; distal means towards the tip.[1,3]
The catheter lumen is the tube’s internal channel. The vessel lumen is the blood-carrying channel. A catheter can be patent—its own lumen is open—yet occupy the wrong vessel or a plane within the vessel wall.[1,4]
Most navigation catheters pass over a guidewire. The wire establishes the route; the catheter follows, directs the next wire movement and adds support. The sheath provides a channel through the vessel entry site; a longer sheath can bring support closer to the target. Moving each component changes the system’s behaviour.[1,2]
Catheters combine polymers, sometimes with reinforcing braid, to balance flexibility, shape retention and resistance to kinking. Radiopaque material or markers make the tip visible on fluoroscopy, the moving X-ray image used during intervention. A visible tip helps you locate the device; it does not establish that its course is safe.[1,2]
The tip and the outlets
An end hole directs fluid out of the catheter tip. Side holes distribute it through a segment of the distal shaft or head. A flush catheter commonly combines multiple side holes with a rounded head, allowing contrast to spread through a larger vessel and reducing a concentrated end-hole jet. A selective catheter commonly has an end hole for targeted delivery.[1,5]
Check the whole outlet-bearing segment is appropriately positioned for injection. A tip marker alone is insufficient when outlets extend further back.[1]
PROPERTIES & BEHAVIOUR
Shape: direction and stability
The primary curve is the bend nearest the tip; a secondary curve lies further back. A simple angled tip changes the direction in which the wire exits. A more complex head also uses its geometry within the parent vessel to orient and support that tip at a branch opening, or ostium.[1]
The useful shape depends on access direction, branch angle, parent-vessel diameter and available space. A larger head may span a wide parent vessel but be crowded in a small one. A tighter curve may face an acutely angled origin while making passage and withdrawal harder. Assess the catheter’s formed shape, not just its French size: an oversized head can bear on and injure the vessel wall.[1,5]
The wire changes the catheter's shape. With the wire withdrawn from the head, the preformed curve can return. Advancing the wire into it opens the curve; the firmer wire shaft may straighten it substantially. This changes both the direction of the tip and the support holding it at the ostium.[1]
A reverse-curve catheter can therefore behave counterintuitively. With a reformed Simmons in the aortic arch, gentle withdrawal may advance the tip farther into the selected arch branch as the catheter length distal to the secondary curve straightens. Advancing the shaft may disengage the tip. Follow the head under imaging rather than assuming that it moves in the same direction as your hand.[1]
Flexibility and trackability: following the route
Trackability is the ability to follow the wire through bends without stalling or displacing the system. Flexibility and reduced friction can help negotiate tortuosity, but a catheter that follows bends readily may provide less stable support for the next device.[1,2]
A hydrophilic coating becomes slippery when appropriately wetted and can improve tracking through a long or tortuous route. It does not guarantee easy passage or stable engagement and cannot correct a wrong wire course.[1,2,6]
Pushability and crossability: moving forwards and crossing disease
Pushability describes how effectively hand movement advances the tip. If the shaft bows while the tip stays still, movement is lost through inadequate support, friction or resistance along the route.[1]
Crossability is the ability to follow the wire through a lesion. A narrow crossing profile and suitable distal tip may help, but the catheter still needs support to reach and cross the obstruction. Successful wire passage does not prove that a larger catheter can safely follow.[1]
More shaft support can improve delivery, but it does not make resistance safe to overcome. Choose only the support needed for the task, confirm the route and observe its effect on the vessel; stiffness is not a solution for uncertain position.[1]
Torque response and support: maintaining control
Torque response is how hub rotation changes tip direction. Tortuosity, friction and constraints along the shaft can make this less predictable. Rotating when the tip is not responding can deform the system rather than improve steering.[1]
Support is the ability to resist displacement while a wire or another device advances. It depends on catheter shape, wire characteristics, sheath position and anatomy. A tip touching the ostium may have selected the artery without establishing a stable platform for treatment.[1]
Closer support can reduce buckling, but deeper engagement may obstruct flow or injure the vessel. Aim to point along the receiving vessel's axis and obtain stable control without unnecessary intubation.[1]
TYPES & EXAMPLES
These examples link common designs to their roles; exact curves and construction vary between manufacturers.[1,2]
| Category and examples | Distinguishing design | Useful role | Principal limitation |
|---|---|---|---|
| Flush: pigtail | Rounded loop and multiple side holes | Distributing contrast for large-vessel angiography, commonly an aortogram | Requires room for the loop, appropriate outlet position and a permitted injection setup. |
| Simple angled selective: Berenstein or Kumpe | A principal bend near the tip | General navigation, directing a wire towards a branch or lesion | May give insufficient reach or support for an awkward origin. |
| Cobra | A broader curved head with secondary geometry | Renal or visceral selection and selected bifurcation work | Support depends on how the head fits the parent vessel. |
| Hook: RIM-type | A tight turn towards the branch opening | Selected visceral origins or aortic bifurcation work | A hook can catch diseased wall; the access route and withdrawal path matter. |
| Reverse curve: Simmons | A returning curve that can face back towards an origin | Branches difficult to engage from the chosen access direction | Reformation and tip movement require understanding of the specific curve and anatomy. |
| Straight exchange | A direct channel over a compatible wire | Preserving access while changing the wire; selected interval imaging | Little directional help for an angled branch. |
| Support/crossing: CXI as one example | A small crossing profile with shaft reinforcement and a suitable distal tip | Supporting a wire through disease and permitting exchange | Support, vessel size and injection permission remain device-specific. |
| Microcatheter: PROGREAT as one example | Small, flexible catheter commonly passed inside a larger catheter | Selective imaging and delivery of compatible treatment to smaller branches | Compatibility includes the outer catheter, wire, intended agent or device, and working length. |
| Guiding catheter | A lumen intended to convey other instruments and a shaft/head providing support | Maintaining a conduit for treatment equipment | A large or deeply engaged catheter may compromise flow; poor alignment may injure the vessel. |
These functions overlap. A diagnostic catheter may guide a compatible microcatheter, and a support catheter may deliver contrast. The category does not establish interchangeability.[1,2,7,8,9]
A guiding sheath combines access with support nearer the target. A guiding catheter conveys other instruments, commonly through an access sheath with an appropriate haemostatic valve. A coaxial system here means one catheter inside another: the outer supplies support while the inner reaches further.[1,2,9]
Balloon, infusion, aspiration/thrombectomy, re-entry and intravascular ultrasound catheters add a treatment or imaging function. Their balloon dimensions, infusion segment, aspiration setup, re-entry mechanism or imaging requirements need separate consideration. Navigation skill provides the foundation; the additional function determines the procedure-specific checks.[1,2,4]
CHOOSING THE TOOL
Start with the next task
For large-territory angiography, choose a suitable flush catheter and plan injection from a stable position. For branch selection, match the head to the origin and access direction. For crossing or wire exchange, choose a compatible catheter that can reach the required position and preserve the route. For device delivery, establish the lumen and support the next instrument needs.[1,2]
Be prepared to change equipment. A soft angled catheter may navigate well but offer insufficient support for treatment. A wire may cross successfully but need replacement with a more suitable rail. Preserve the position gained during the change.[1]
Let the anatomy modify the plan
Review branch angle, parent-vessel size, tortuosity, disease and distance from access. These determine whether a simple angle is enough, a larger curve is useful, or another approach offers safer control. Choose a projection separating the target origin from overlapping vessels.[1]
At a heavily diseased ostium, minimise scraping by the catheter and favour a controlled wire-led approach from a stable position. In suitable less-diseased anatomy, a shaped catheter can lead selective engagement before the wire advances. These are deliberate techniques chosen for the vessel; ordinary passage through a long diseased segment remains wire-led.[1]
Complex heads often need reformation after entering straight over a wire. Plan the space and manoeuvre for that specific curve. Arch disease and aneurysmal or occlusive aorto-iliac disease may make a proposed manoeuvre unsafe and favour another route. Avoid dragging a hook through an aneurysm. Reformation methods are shape-specific; do not transfer a manoeuvre between catheters or improvise against diseased wall.[1]
Change the mechanism when the first choice fails
If the catheter repeatedly disengages, improve geometry or support. If it cannot follow a confirmed route, reassess profile, friction, wire support and sheath position. If it cannot reach, reconsider usable length or access. If the required injection is not permitted, choose a catheter that allows it. Do not repeat an unsuccessful movement with more force.[1,3,7,8]
SIZING & COMPATIBILITY
Outer diameter, inner diameter and wire diameter
French size describes catheter outer diameter: 3 Fr is approximately 1 mm. It does not state internal diameter. Catheters of the same French size can have different wall construction and accommodate different equipment.[1,2,5]
A sheath’s labelled French size generally describes the catheter size it accommodates; its own outer diameter is larger. A catheter and sheath with the same French number therefore occupy different diameters in the artery.[2]
Check the specified wire diameter, catheter fit through the sheath and valve, and compatibility of any device delivered through the catheter separately. A 0.035-inch-compatible catheter does not necessarily have an internal diameter of exactly 0.035 inches. Physical fit alone does not establish suitability for delivering a coil, plug or other device.[1,2,3,7]
For a microcatheter within a larger catheter, compare the outer catheter's stated internal diameter with the microcatheter's maximum external profile and both manufacturers' requirements. Proximal and distal microcatheter diameters can differ. Material and preparation compatibility also matter when delivering embolic agents.[2,7]
Working length and exchange length
Choose enough usable catheter length to reach through the planned sheath and anatomical route while retaining external control. An inner catheter must extend far enough beyond the outer one to reach the target. Check the next treatment device at the same time: a diagnostic catheter reaching the artery does not prove the balloon or stent system will reach it.[1,2]
In an over-the-wire system, the wire traverses the full catheter length. An exchange requires adequate wire remaining in a safe distal position and enough external wire for uninterrupted hand control as the catheter is removed. A rapid-exchange system uses a short distal wire channel; it does not shorten the requirements of other full-length devices used in the case.[1]
Injection compatibility
A catheter that delivers contrast is not automatically suitable for power injection. Confirm permission, pressure and flow limits for the exact device, together with the tubing, connectors and injector. Confirm whether the intended sequence requires wire removal. Space around a wire or successful hand injection does not establish permission for power injection.[1,3,7,8]
Pressure drives injection; flow rate describes delivery in mL/s; volume is the total delivered. Achievable flow depends on lumen, length, outlets, contrast viscosity and the connected system. Maximum pressure is an equipment limit, not a target. Device permission and anatomical safety remain separate: select the actual injection for the receiving vessel and imaging task.[1,2,3,5,7]
HANDLING PRINCIPLES
Prepare the system
Before insertion, agree the target, next device and alternative plan. Inspect the package, catheter, tip and hub; confirm compatibility, usable length and intended vascular territory. Prepare the lumen, coating and connectors according to the exact instructions for use (IFU), removing air before connection.[1,3,6,7,8]
Maintain the specified hydration. Excessive wiping, unsuitable solvents or tight interfaces can damage a coating, and detached material can cause embolic injury. Shape the tip only when the exact device instructions permit it. An IFU's preparation fluid does not define the patient's systemic anticoagulation prescription; agree that separately for the procedure.[3,6,7,8]
Move one component deliberately
Place the wire in the intended route before the catheter follows. Advance the catheter in short increments while a designated operator holds the wire position. A long unsupported external segment tends to bow instead of transmitting movement. Observe the catheter tip and distal wire position, using the device's prescribed handling method.[1]
During ordinary wire-led navigation, do not advance the catheter beyond the wire tip. It may lose support or reform unexpectedly. Through tortuosity, progress can alternate: advance the wire safely, bring the catheter forwards to support it, then redirect the wire towards the next turn.[1]
Check flow after engagement and crossing. If the wire or catheter stops flow through a critical lesion, alert the supervising operator, review systemic anticoagulation promptly and make an immediate plan to restore flow or treat the lesion. Do not leave the vessel obstructed while repeatedly attempting the same manoeuvre.[1]
Establish safe position and patency before injection
Treat injection as a new decision, even when navigation has gone smoothly.[1]
- Locate the tip and outlets. Confirm the receiving vessel and the position of the whole side-hole segment. Look for a tip against the wall, a constrained head, deep engagement or an unexpected course.
- Assess patency. In routine angiographic catheter use, aspirate and establish appropriate blood return. Unexpectedly absent or poor return requires reassessment of connections, catheter and position before injection.
- Resolve uncertainty about the route. Blood return does not establish distal true-lumen position after a difficult crossing. Use procedural imaging and further views or an appropriate adjunct such as intravascular ultrasound when needed.
- Prepare a fluid-filled connection. Remove air from the catheter, syringe, tubing and connectors; check that the setup is secure and permitted.
- Check outflow under imaging. Once position and patency are satisfactory, use an appropriately cautious test injection before the planned injection. Stop for unexpected resistance, staining or extravasation—contrast escaping outside the vessel.[1,3,4,7,8]
Small-lumen catheters have device-specific confirmation sequences. An absent aspirate alone should neither prove malposition nor be dismissed because the catheter is small. Follow the exact instructions; some describe a small, slow contrast injection to verify outflow after preparation and positioning. Suspected obstruction or an unsafe course must be resolved first. Hand injection does not make a blocked or malpositioned catheter safe, and forceful injection into a vessel-wall plane can extend dissection.[1,4,7]
Preserve access during exchanges
Change the wire: the catheter stays. Change the catheter: the wire stays.[1]
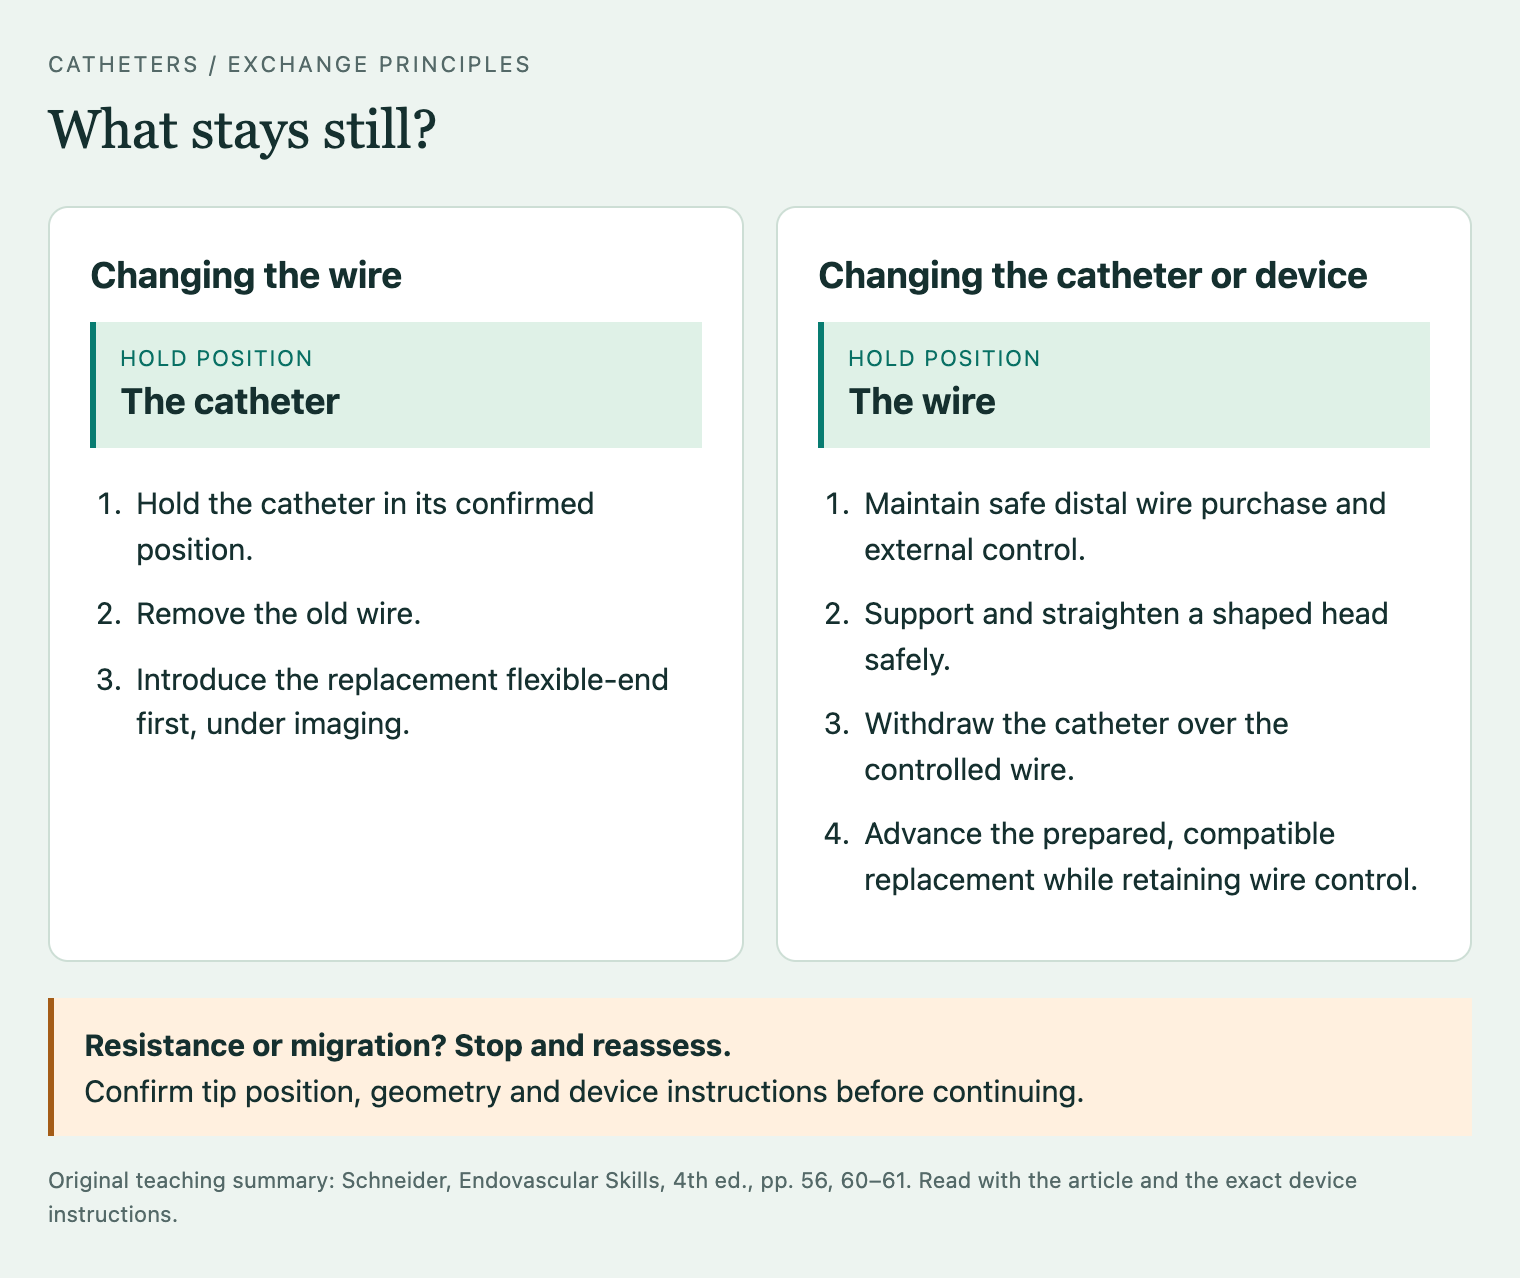
To change the wire, advance a compatible catheter to a stable, confirmed position that preserves the segment already crossed. Hold it there, remove the original wire and introduce the replacement flexible end first. Confirm its course and final position before removing the catheter.[1]
To change the catheter, establish sufficient wire length and safe distal purchase—enough wire in a suitable segment to retain position. Hold, or pin, the wire while withdrawing the catheter over it. Transfer the grip without losing control and watch for distal migration or the catheter dragging the wire back.[1]
Resistance during either exchange requires a stop and imaging of the involved system. Follow the exact catheter–wire instructions once the cause is understood; some situations require removal of the involved assembly together. Pulling harder through a resistant catheter can injure the vessel or damage the device.[3,7]
Withdraw a shaped head under control
For routine removal, a compatible wire supports and straightens the head. Watch the process: advancing the firmer wire shaft into a loop can make it flip open, which may be unsafe in a small or diseased segment. Schneider also describes controlled catheter withdrawal over a wire passed through the still-curved head, allowing the curve to straighten during withdrawal. Choose the safe method for the anatomy and exact device instructions; never force a resistant loop.[1,3]
Final removal differs from an exchange. During an exchange, useful wire access remains. Once access is no longer needed, follow the device's final-removal sequence, which may permit or require catheter and wire removal together. Preserve access until treatment and the completion assessment are satisfactory, then remove equipment deliberately.[1,3,7]
PITFALLS & TROUBLESHOOTING
The catheter selects the artery but will not stay there
Identify when it disengages. During wire advancement, the wire may straighten the head and remove its support. During catheter advancement over the wire, inadequate purchase or slack may allow the wire to be dragged back and the system to bow into the parent vessel.[1]
Check the projection, curve, wire behaviour and support closer to the target. Renal and visceral branches offer limited safe wire length; simply pushing the wire deeper is not a reliable solution. Change the geometry, support or approach when the current combination remains unstable.[1]
The wire crosses, but the catheter will not follow
Stop forward pressure and locate the point where movement ceases.[1]
| Possible explanation | Checks | Response or stopping point |
|---|---|---|
| Wrong route | Confirm the wire is not in a collateral, wall plane or through a stent strut. | Resolve the route before advancing a larger device. |
| Kink, damaged component or tight interface | Inspect the wire, catheter course and external valve/connection. | Correct a permitted external setup problem or replace damaged equipment. |
| Inadequate support | Identify bowing, excessive slack or a floppy wire segment at the resistance point. | Improve support after confirming position; consider closer sheath support or a suitable wire exchange. |
| Accumulated friction or tortuosity | Review the whole route in a useful projection. | Consider a more suitable catheter, supported coaxial system or different access. |
| Severe lesion | Assess the intended route, profile mismatch and distal flow. | Consider a smaller compatible profile or supervised lesion preparation. Flow interruption requires prompt escalation. |
Predilation is an option only when a suitable balloon can safely reach the confirmed lesion. Repeated failure may require a different plan; wire passage does not prove that catheter passage is safe or mechanically possible.[1,4]
Injection becomes difficult, or the catheter stops responding
Stop injection for unexplained increased resistance. Check the connection, valve, catheter course and tip position. Do not use pressure or a wire to clear an unexplained intravascular obstruction. A blocked or kinked catheter can rupture if pressurised.[3,7]
If rotation or traction at the hand does not produce the expected tip movement, stop adding force. Image the relevant system and obtain experienced help for possible kinking, knotting or entrapment. Do not reflexively force a stiff wire into a suspected knot or damaged catheter; rescue depends on the actual device and failure mechanism.[1,3,7]
Injury, loss of flow or device damage
Unexpected pain, an abnormal course, contrast staining or extravasation, reduced distal flow or haemodynamic change requires immediate reassessment. Stop manipulation and injection, alert the supervising operator, assess circulation and perfusion, and preserve useful access if safe.[1,4]
A flow-limiting dissection may need prolonged balloon treatment or stenting. Active rupture requires prompt balloon control or tamponade while definitive treatment is prepared; iliac rupture commonly requires urgent covered stenting when feasible. Activate resuscitation and senior endovascular and vascular surgical support. Proximal bleeding can be rapidly life-threatening, and reflex removal of useful access may compromise rescue.[4]
A new filling defect or sudden loss of perfusion may reflect thrombus or embolism; thrombus can be difficult to distinguish from spasm. Air, thrombus, plaque and device fragments are different possible embolic sources and require assessment of the actual cause.[1,4,6]
If a catheter leaks, fractures or loses a component, stop using it, account for the equipment and obtain a controlled removal or retrieval plan. Preserve the device and packaging for investigation and follow the local device-incident reporting pathway.[6,10]
REMEMBER
- Choose for the next task. Navigation, stable treatment support and contrast injection need different properties.
- Predict the geometry. Wire position changes the catheter head; hand movement does not always predict tip movement.
- Check the whole system. Outer diameter, internal lumen, usable length, wire length and injection permission are separate requirements.
- Separate patency from position. Blood return does not prove the intended true lumen, and hand injection does not make uncertainty safe.
- Preserve useful access and respond to failure early. Keep the correct component still during exchange; stop for unexplained resistance and escalate promptly for flow loss or injury.[1,2,3,4,7,8]
References
- Schneider PA. Endovascular Skills: Guidewire and Catheter Skills for Endovascular Surgery. 4th ed. Boca Raton: CRC Press; 2019 (copyright 2020). doi:10.1201/9780429156304.
- Jamieson P, Allouni AK. Basic tools and terminology for endovascular interventions. In: Geroulakos G, Avgerinos E, Becquemin JP, Makris GC, Froio A, editors. Mastering Endovascular Techniques: Tips and Tricks in Endovascular Surgery. Cham: Springer; 2024. doi:10.1007/978-3-031-42735-0_5.
- Terumo Corporation. RADIFOCUS GLIDECATH: instructions for use, 4 Fr and 5 Fr. RC34A515-01. 2020 Jun. Rev.1 [cited 2026 Oct 1]. IFU.
- Makris G, Parker M, Ali T. Re-entry and recanalisation techniques in the endovascular management of peripheral arterial disease. In: Geroulakos G, Avgerinos E, Becquemin JP, Makris GC, Froio A, editors. Mastering Endovascular Techniques: Tips and Tricks in Endovascular Surgery. Cham: Springer; 2024. doi:10.1007/978-3-031-42735-0_11.
- Sidawy AN, Perler BA, editors. Rutherford’s Vascular Surgery and Endovascular Therapy. 10th ed. Elsevier; 2023.
- US Food and Drug Administration. Intravascular catheters, wires, and delivery systems with lubricious coatings: labeling considerations. 2019 Oct 10 [cited 2026 Sep 30]. Guidance.
- Terumo Corporation. PROGREAT: instructions for use. PG34E002-05. Rev.10. 2023 Nov [cited 2026 Oct 1]. IFU.
- Cook Medical. CXI Support Catheter: instructions for use. T_CXI1GEN_REV1. 2019 Sep [cited 2026 Oct 1]. IFU.
- Boston Scientific. MACH 1 Guide Catheter: indications, safety and warnings. Summary prescriptive information [cited 2026 Sep 30]. Manufacturer information.
- Medicines and Healthcare products Regulatory Agency. The Yellow Card scheme: guidance for healthcare professionals, patients and the public. Updated 2025 Jul 24 [cited 2026 Sep 30]. Guidance.